
Every October, my social feeds fill up with Halloween desserts that look like they belong in a bakery window — towering spider cupcakes, hand-painted sugar cookies, elaborate cake pops shaped like pumpkins. They’re beautiful, but most of them require piping skills, specialty tools, or an entire afternoon I don’t have during a busy fall week. If you’ve ever scrolled through those photos and thought “that’s lovely, but I just want a cookie that tastes good and looks a little spooky,” these Halloween chocolate chip cookies are for you.
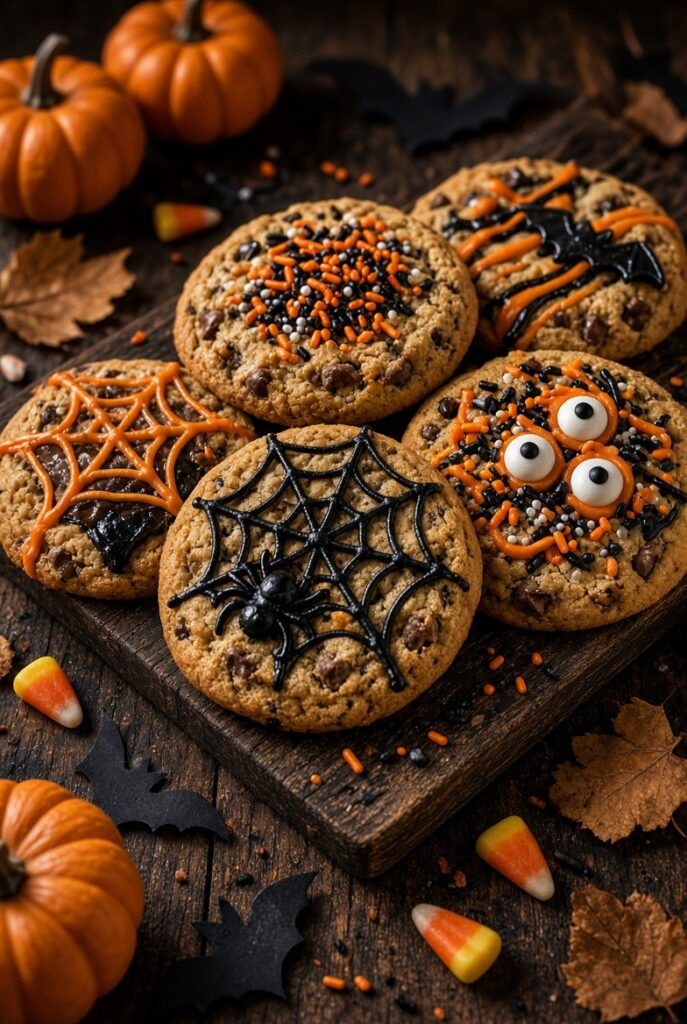
This recipe starts from a classic chocolate chip cookie base — the kind with soft centers, slightly crisp edges, and plenty of chocolate in every bite — and dresses it up for the season with a few simple touches: orange and black sprinkles, candy eyes, or a handful of Halloween M&M’s pressed into the top. No fondant, no royal icing, no decorating bags. Just a reliable dough and a few festive additions that take minutes, not hours.
What I like most about this recipe is that it solves two problems at once. First, it gives you a genuinely good chocolate chip cookie — chewy, not cakey, not dry, not spread thin as a cracker. Second, it gives you an easy way to make that cookie feel like a Halloween treat without turning baking into a project. Whether you’re making a batch for a school party, a family movie night, or just because it’s October and you want something orange and chocolatey in the kitchen, this recipe is built to be low-stress and high-reward.
Below, I’ll walk through exactly how I developed this recipe, what I learned along the way, and how to avoid the most common mistakes that trip people up with chocolate chip cookies in general — spreading, dryness, uneven baking, and decorations that don’t survive the oven.
My Experience Developing This Recipe
When I first set out to make a Halloween version of chocolate chip cookies, my goal was simple: I wanted a cookie that still tasted like a classic chocolate chip cookie, not a heavily decorated sugar cookie wearing a costume. A lot of “Halloween cookie” recipes online lean so hard into the decoration that the cookie itself becomes an afterthought — thin, crunchy, and mostly a vehicle for icing. That wasn’t what I wanted.
I started with a standard chewy chocolate chip cookie formula and began testing how far I could push the “festive” side without sacrificing texture. One mistake I made early on was adding sprinkles directly into the dough along with the chocolate chips. The colors bled slightly into the dough during baking, and the cookies came out looking muddy rather than festive. I learned quickly that pressing sprinkles and candy onto the tops of the dough balls right before baking — rather than mixing them in — gave a much cleaner, more intentional look.
The other lesson came from chilling the dough. On my first test batch, I skipped the chill step because I was in a hurry, and the cookies spread into thin, lacy discs that ran into each other on the pan. The second batch, chilled for about 30 minutes, held its shape much better and baked up thick and soft. That one change made the biggest difference in how the cookies turned out, and it’s something I’ll explain in more detail in the troubleshooting section below.
If you’re anything like me, you also want to get a Halloween treat on the table without spending your whole evening on it — I’ll admit that on busy weeks, having a plan for what to bake (and what to cook for dinner) makes a real difference. That’s actually part of why I’ve started keeping a set of go-to resources on hand, including the Meal Planning Made Easy E-books, which I’ll mention again later — they’re a genuinely useful option if you like having your week’s meals and treats mapped out ahead of time instead of deciding everything on the fly.
Why You’ll Love These Halloween Chocolate Chip Cookies
- Simple, pantry-friendly ingredients. Nothing here requires a specialty grocery trip.
- Classic chewy texture. These are chocolate chip cookies first, Halloween cookies second — the flavor isn’t sacrificed for the theme.
- Minutes of decorating, not hours. Sprinkles, candy eyes, or extra chocolate chips do the job.
- Great for a crowd. The recipe scales easily for parties, classrooms, or family gatherings.
- Make-ahead friendly. Dough can be chilled or frozen well ahead of when you need the cookies.
- Easy to customize. Swap in different mix-ins or colors depending on what you have on hand.
- No special equipment needed. A basic mixer (or just a bowl and a wooden spoon) will do.
Ingredients and Why They Matter
Understanding what each ingredient does makes it much easier to troubleshoot if something goes wrong, so here’s a quick breakdown.
All-purpose flour gives the cookies their structure. Too little and the cookies spread too much; too much and they turn out dry or cakey. Spoon the flour into your measuring cup and level it off rather than scooping directly from the bag, which packs in extra flour and dries out the dough.
Butter provides flavor and helps create that chewy texture. I use unsalted butter, softened but still cool to the touch — not melted. Butter that’s too warm is one of the most common reasons cookies spread too much in the oven.
Brown sugar adds moisture, chewiness, and a slight caramel flavor because of its molasses content. This recipe uses more brown sugar than white sugar, which is part of why these cookies stay soft rather than turning crisp all the way through.
Granulated sugar helps with spread and gives the edges a bit of crispness for contrast against the soft centers.
Eggs bind the dough together and add moisture. One whole egg plus one egg yolk is my preferred combination here — the extra yolk adds richness and helps keep the centers soft.
Vanilla extract rounds out the flavor. Use real vanilla extract if you can; the difference is noticeable in a simple recipe like this one.
Baking soda helps the cookies rise slightly and spread in a controlled way. Make sure yours isn’t expired — old baking soda is a common, overlooked reason for flat or dense cookies.
Salt balances the sweetness and makes the chocolate flavor more pronounced. Don’t skip it, even though it’s a small amount.
Chocolate chips are the heart of the recipe. Semi-sweet is my standard choice, but milk chocolate or dark chocolate both work well depending on your preference.
Halloween sprinkles, candy eyes, or Halloween-colored candies are optional but recommended for the festive look. These go on top of the dough, not mixed in, for the cleanest appearance.
Full Recipe: Halloween Chocolate Chip Cookies
Yield: 20–22 medium cookies Prep time: 20 minutes Chill time: 30 minutes (minimum), up to 24 hours Bake time: 10–12 minutes per batch Total time: About 1 hour, including chilling Serving size: 1 cookie Estimated cost: Around $8–10 for the full batch, depending on your area and whether you already have baking staples on hand
Equipment needed:
- Mixing bowls (or a stand mixer with a paddle attachment)
- Measuring cups and spoons, or a kitchen scale
- Baking sheets
- Parchment paper or silicone baking mats
- Cookie scoop (about 1.5 tablespoons) or a regular spoon
- Wire cooling rack
Ingredients
- 2 ¼ cups (280g) all-purpose flour
- 1 teaspoon baking soda
- ½ teaspoon salt
- ¾ cup (170g) unsalted butter, softened
- ¾ cup (150g) packed brown sugar
- ¼ cup (50g) granulated sugar
- 1 large egg, plus 1 egg yolk
- 1 ½ teaspoons vanilla extract
- 1 ½ cups (255g) semi-sweet chocolate chips, divided
- Halloween sprinkles, candy eyes, or Halloween-colored candy-coated chocolates, for topping
Instructions
- Whisk the dry ingredients. In a medium bowl, whisk together the flour, baking soda, and salt. Set aside. This ensures the baking soda and salt are evenly distributed, which helps the cookies bake consistently.
- Cream the butter and sugars. In a large bowl, beat the softened butter with the brown sugar and granulated sugar for about 2 minutes, until the mixture looks pale and fluffy. This step incorporates air into the dough, which contributes to a lighter texture — don’t rush past it.
- Add the egg, yolk, and vanilla. Mix until fully combined. The mixture should look smooth and slightly glossy.
- Add the dry ingredients gradually. Mix on low speed, or stir by hand, just until the flour disappears into the dough. Overmixing at this stage develops gluten, which can make cookies tough, so stop as soon as you no longer see streaks of flour.
- Fold in most of the chocolate chips. Reserve a small handful to press onto the tops of the dough balls later — this is a simple trick that makes the finished cookies look more generously loaded with chocolate.
- Chill the dough for at least 30 minutes. This is the step I skipped in my first test batch, and it’s the one that matters most for controlling spread. Chilling firms up the butter so it melts more slowly in the oven, which means the cookies hold their shape instead of spreading thin. If you have time, chilling for a few hours (or overnight) develops even more flavor.
- Preheat the oven to 350°F (175°C) while the dough finishes chilling. Line your baking sheets with parchment paper or silicone mats.
- Scoop the dough into balls, about 1.5 tablespoons each, and place them a couple of inches apart on the baking sheet. Press a few reserved chocolate chips onto the top of each ball, along with any sprinkles or candy you’re using for decoration.
- Bake for 10–12 minutes. Instead of watching the clock alone, look for the edges to turn light golden while the centers still look slightly soft and underbaked. The centers will continue to set as the cookies cool on the pan — pulling them out a little early is part of what keeps them soft.
- Cool on the pan for 5 minutes, then transfer to a wire rack to finish cooling completely.
Storage Instructions
Store cooled cookies in an airtight container at room temperature for up to 5 days. A slice of bread in the container can help keep them soft longer, since the cookies draw moisture from it.
Freezing Instructions
Both the dough and the baked cookies freeze well — see the make-ahead section below for full details.
Halloween Decorating Ideas (No Skills Required)
You don’t need decorating experience to make these cookies look festive. Here are several simple options:
- Orange and black sprinkle mix pressed onto the tops before baking for a classic Halloween look.
- Purple and green sprinkles for a more “witchy” or Frankenstein-inspired color palette.
- Candy eyes pressed into the dough — two or three per cookie is usually enough to make them look playful without being fussy.
- Halloween-colored candy-coated chocolates (orange, black, and purple) pressed on top instead of, or alongside, chocolate chips.
- Extra chocolate chips simply pressed onto the surface for a bakery-style look with zero extra effort.
- A light drizzle of melted chocolate in white, orange, or dark chocolate once the cookies have cooled, using a spoon or a piping bag.
- “Monster” cookies made by adding a few candy eyes off-center and a jagged line of melted chocolate for a mouth — a fun option if you’re baking with kids.
Troubleshooting: Common Chocolate Chip Cookie Problems
Why did my cookies spread too much?
This is almost always related to butter temperature or a lack of chilling. If the butter was too soft (or melted) when you mixed the dough, or if you skipped the chilling step, the dough won’t hold its shape in the oven’s heat. Make sure your butter is softened but still cool, and don’t skip the 30-minute chill.
Why are my cookies dry?
Overbaking is the most common cause. Because cookies continue to cook on the hot pan after you take them out of the oven, pulling them out when the centers still look slightly underdone actually gives you the correct final texture. Too much flour, from over-measuring, can also dry out the dough.
Why are my cookies cakey?
Too much flour or too much leavening (baking soda) relative to fat and sugar can push cookies toward a cakey texture. Measuring flour by spooning it into the cup rather than scooping, and sticking to the recipe’s ratios, helps keep the texture chewy rather than fluffy.
Why didn’t my cookies stay soft?
Overbaking is usually the culprit here too. Soft cookies depend on slightly underbaking the centers and letting residual heat finish the job. Storing them in an airtight container (with a slice of bread, if you like) also helps maintain softness over the following days.
Why did my chocolate chips sink to the bottom?
This can happen if the dough is too warm or too soft when the cookies go into the oven, since the chips have room to settle before the structure sets. Chilling the dough helps prevent this, and tossing the chips in a light coating of flour before folding them in can also help distribute them more evenly.
Why did my Halloween decorations melt or bleed color?
Sprinkles and candies added directly into the dough can bleed color as they bake. Pressing them onto the surface just before baking, rather than mixing them into the dough, keeps the colors cleaner. Some very delicate candies (like certain candy melts) can also lose their shape in the oven — for those, it’s safer to add them after baking instead.
Why are my cookies different sizes?
Inconsistent scoop sizes are the usual reason. A cookie scoop keeps portions even, which also helps them bake at the same rate so you don’t end up with some cookies done early and others underbaked.
Should I chill the cookie dough?
Yes — for this recipe, chilling for at least 30 minutes makes a real difference in how much the cookies spread and how thick they turn out. If you’re short on time, even a quick 20-minute chill in the freezer helps, though a full 30 minutes to a few hours in the refrigerator gives the most reliable results.
Make-Ahead Instructions
These cookies are well suited to Halloween party planning, since both the dough and the baked cookies can be prepared in advance.
- Refrigerated dough: The dough can be made up to 3 days ahead and kept covered in the refrigerator. This also tends to deepen the flavor slightly.
- Frozen dough: Scoop the dough into balls, freeze them on a tray until solid, then transfer to a freezer bag or airtight container. Frozen dough balls keep well for up to 3 months.
- Baking from frozen: You can bake the dough balls directly from frozen — no need to thaw first. Add about 1–2 extra minutes to the bake time and watch for the same visual cues (set edges, soft centers) rather than relying on the timer alone.
- Baked cookies ahead of time: Baked cookies can be made a day or two before your event and stored in an airtight container at room temperature.
If you’re planning treats for a Halloween gathering alongside other dishes, having a broader plan for the week can take some of the pressure off. This is where I’ve found the Meal Planning Made Easy E-books genuinely helpful — they’re built around organizing meals and recipes in advance, so you’re not figuring out what to cook (or bake) from scratch every single day during a busy season.
Storage and Freezing
Room temperature: Store baked cookies in an airtight container for up to 5 days. Keeping them away from direct sunlight or heat helps preserve texture.
Freezing baked cookies: Once completely cooled, layer the cookies between sheets of parchment paper in an airtight container or freezer bag. They’ll keep for up to 3 months. Thaw at room temperature for about 20–30 minutes before serving.
Freezing cookie dough: As mentioned above, portioned dough balls freeze well for up to 3 months and can be baked directly from frozen.
Restoring texture after freezing: A few seconds in the microwave (start with 8–10 seconds) can bring back some of that fresh-baked softness if the cookies have firmed up in storage.
Variations to Try
- Double chocolate Halloween cookies: Replace ¼ cup of the flour with unsweetened cocoa powder for a chocolate base, then top with Halloween sprinkles as usual.
- Peanut butter chocolate chip version: Swap ¼ cup of the butter for creamy peanut butter for a nutty twist.
- White chocolate version: Use white chocolate chips in place of semi-sweet for a sweeter, creamier flavor that pairs nicely with orange sprinkles.
- Halloween candy-coated chocolate cookies: Fold in Halloween-colored candy-coated chocolates instead of, or in addition to, chocolate chips.
- Chocolate-orange version: Add a small amount of orange zest to the dough for a subtle citrus note against the chocolate.
- Mini Halloween cookies: Use a smaller scoop (about 1 tablespoon) and reduce the bake time by 2–3 minutes for bite-sized treats, great for a crowd or a treat table.
- Extra chocolate version: Increase the chocolate chips to 2 cups for a more chocolate-forward cookie.
Planning for a Halloween Gathering
You don’t need to be hosting a huge party for this recipe to make sense. For a small family treat night, a single batch of 20–22 cookies is usually plenty. For a classroom party, larger family gathering, or neighborhood event, doubling the recipe is straightforward since the ratios scale cleanly.
A few practical tips:
- Bake in stages if you’re making a double batch, since most home ovens only comfortably fit one or two trays at a time.
- Package cookies individually in small cellophane bags tied with orange or black ribbon if you’re sending them home with guests or trick-or-treaters.
- Pair them with other simple Halloween desserts, like caramel apples or a bowl of candy corn, rather than trying to make everything from scratch.
- Make the dough ahead using the freezing instructions above, so all you have to do on the day of your event is bake.
Approximate Nutrition (Per Cookie)
These values are estimates based on a batch of 20 cookies and will vary depending on exact ingredients and portion size.
- Calories: about 180–200
- Carbohydrates: about 24g
- Protein: about 2g
- Fat: about 9g
- Sugar: about 15g
- Fiber: about 1g
Frequently Asked Questions
Can I make these cookies ahead of time? Yes. The dough can be refrigerated for up to 3 days or frozen for up to 3 months, and baked cookies keep well for several days at room temperature.
Do I need to chill the dough? For the best texture and to prevent excessive spreading, yes — at least 30 minutes is recommended, though longer chilling deepens the flavor further.
How do I keep chocolate chip cookies soft? Avoid overbaking, since the cookies continue to set after you remove them from the oven. Storing them in an airtight container, ideally with a slice of bread, also helps maintain softness.
Can I freeze Halloween cookie dough? Yes, scooped dough balls freeze well for up to 3 months and can be baked straight from frozen with a slightly longer bake time.
Can I use different Halloween decorations? Absolutely. Sprinkles, candy eyes, and Halloween-colored candies all work well when pressed onto the dough just before baking.
Why did my cookies spread too much? This usually comes down to butter that was too warm or dough that wasn’t chilled long enough. Both are easy fixes for the next batch.
How should I store Halloween cookies? In an airtight container at room temperature for up to 5 days, or in the freezer for longer storage.
Can I make smaller cookies? Yes, use a smaller scoop and reduce the bake time by a couple of minutes, checking for the same visual cues.
Can I use milk chocolate instead of semi-sweet chocolate? Yes, milk chocolate chips work well and will give the cookies a sweeter flavor overall.
How long do homemade Halloween cookies last? Typically up to 5 days at room temperature in an airtight container, or up to 3 months in the freezer.
Final Thoughts
These Halloween chocolate chip cookies are meant to be simple: a reliable, chewy chocolate chip cookie base with just enough festive touches to feel like part of the season, without requiring hours of decorating or a long list of specialty ingredients. Whether you’re baking for a classroom party, a family gathering, or just an October evening at home, this recipe is easy enough to make on a weeknight and festive enough to bring to a Halloween table.
If you enjoy having recipes like this ready to go, and you’d rather spend your time actually cooking and baking than deciding what to make next, the Meal Planning Made Easy E-books are worth a look — they’re designed to help take some of the daily guesswork out of meals, which can be especially useful heading into a busy holiday season.
Give these Halloween chocolate chip cookies a try, save the recipe for later, or pass it along to anyone who’s planning treats for their own Halloween gathering this year.